Reverse Proxy
1. Reverse proxy in a container
1.1 Intro��
We will install a reverse proxy in a Docker container, with the help of docker-scripts.
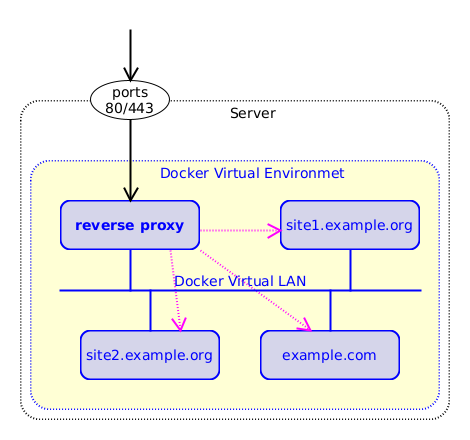
The job of a reverse proxy is to stand between the clients (browsers)
and the sites that are served by different containers. All client
requests (on ports 80 and 443) are forwarded by the host to the
reverse proxy container. Based on the domain of the request, the proxy
container makes another HTTP request to the appropriate container
(that serves the given domain), and forwards the response to the
original client. So, it acts like a man-in-the-middle between the
clients and the containers that serve the different domains. It can
also be thought like an HTTP gateway or hub for different domains.
Besides making it possible to serve several domains from different containers, the reverse proxy container can also help with other tasks, like:
- getting and maintaining a letsencrypt certificate for each of the domains that it is managing
- redirecting HTTP requests to HTTPS automatically
- improving performance by caching HTTP responses
- shielding (or protecting) the domains from some attacks from the internet
- etc.
If there was no reverse proxy, each container that serves a domain would have to take care of these tasks by itself. For example each container would have to get and maintain letsencrypt certificates for the domains that it serves. However the reverse proxy makes simple the life of the containers by taking care of these tasks for each of them.
1.2 Install revproxy
-
Get the scripts:
ds pull revproxy -
Initialize a directory:
ds init revproxy @revproxy -
Customize the settings:
cd /var/ds/revproxy/
nano settings.sh
Modify
SSL_CERT_EMAILby setting your email address. -
Make the container:
ds make
1.3 Check config files
Let's check some config files:
tree
The directories domains/ and letsencrypt/ are empty because no
domains are being managed yet.
-
The configuration of the default site:
nano conf.d/default.confThe default configuration redirects all HTTP requests to HTTPS, except for the requests that are needed by
certbotand letsencrypt to verify that we own the domain for which we are requesting a certificate. -
Example domain configuration:
nano example.confThe config file
example.confis used like a template for the configuration of the domains that are managed. Of course,example.orgis replaced by the domain that is managed, and the SSL certificates are replaced by the path of the letsencrypt certificates for the domain.
1.4 Test some commands
-
Add some domains with
ds domains-add:ds domains-add \
site1.user1.fs.al \
alias1.user1.fs.al \
alias2.user1.fs.al
ds domains-add site2.user1.fs.al
ds domains-ls
ls domains/
nano domains/site1.user1.fs.al.conf
nano domains/site2.user1.fs.al.conf -
Get letsencrypt certificates for these domains:
ds get-ssl-cert \
        site1.user1.fs.al \
        alias1.user1.fs.al \
        alias2.user1.fs.al
ds get-ssl-cert site2.user1.fs.al

ls letsencrypt/
ls letsencrypt/live/
ls letsencrypt/live/site1.user1.fs.al/
ls letsencrypt/live/site2.user1.fs.al/

ls domains/
nano domains/site1.user1.fs.al.conf
nano domains/site1.user2.fs.al.conf

ds get-ssl-cert site1.example.com
ds get-ssl-cert site1.test.com -
Remove them:
ds domains-rm \
      site1.user1.fs.al \
      site2.user1.fs.al
ds domains-ls
ls domains/

ds del-ssl-cert site1.user1.fs.al
ds del-ssl-cert site2.user1.fs.al
2. Test revproxy
2.1. Setup domains
For a simple test we are going to use the domains site1.example.com,
alias1.example.com and site2.example.com, which are fake
domains. So, let's add them first to /etc/hosts, so that we are able
to resolve them:
sed -i /etc/hosts -e '/example\.com/d'

cat <<EOF >> /etc/hosts
127.0.0.1    site1.example.com
127.0.0.1    alias1.example.com
127.0.0.1    alias2.example.com
127.0.0.1    site2.example.com
EOF

grep example.com /etc/hosts

ping site1.example.com
2.2 The test app
We are going to use the scripts on test/app1 in order to install a couple of simple apps.
cd /opt/docker-scripts/revproxy/
ls test/app1/
tree test/app1/
nano test/app1/Dockerfile
nano test/app1/cmd/config.sh
nano test/app1/inject/setup.sh
nano test/app1/settings.sh
The variable DOMAIN on settings.sh contains the main domain of the
application, and the (optional) variable DOMAINS may contain other
names (or aliases) for this application.
2.3 Install simple containers
Let's install a couple of containers that are based on the test app
and use the example.com domains:
-
Install a test container for the domain
site1.example.com, with aliasesalias1.example.comandalias2.example.com:ds init revproxy/test/app1 @test/site1.example.com
cd /var/ds/test/site1.example.com/
nano settings.sh
ds makeMake sure that
settings.shlooks like this, before runningds make:DOMAIN=site1.example.com
DOMAINS="alias1.example.com alias2.example.com"noteNotice that we are not forwarding the ports 80/443 from the host to this container.
-
Install another test container for the domain
site2.example.com:ds init revproxy/test/app2 @test/site2.example.com
cd /var/ds/test/site2.example.com/
nano settings.sh
ds makeIn this case make sure that
settings.shlooks like this, before runningds make:DOMAIN=site2.example.comnoteThere are no aliases in this case, so the variable
DOMAINSis not needed. -
Install a test container for the domain
site3.user1.fs.al, with aliasalias3.user1.fs.al:ds init revproxy/test/app1 @test/site3.user1.fs.al
cd /var/ds/test/site3.user1.fs.al/
nano settings.sh
ds makeMake sure that
settings.shlooks like this, before runningds make:DOMAIN="site3.user1.fs.al"
DOMAINS="alias3.user1.fs.al"
2.4 Test the reverse proxy
We can use curl to test that we can access both sites through the
reverse proxy:
curl https://site1.example.com
curl -k https://site1.example.com

curl -k https://alias1.example.com
curl -k https://alias2.example.com

curl -k https://site2.example.com

curl https://site3.user1.fs.al
curl https://alias3.user1.fs.al
The option -k, --insecure is needed because we are using fake
domains for testing, and we can't get a certificate for them. For real
domains/subdomains we don't need this option.
We can also try to open https://site3.user1.fs.al/ in a browser.
2.5 Check revproxy config
Let's check the configuration of revproxy:
ds @revproxy domains-ls

cd /var/ds/revproxy/

ls domains/
nano domains/site1.example.com.conf
nano domains/site2.example.com.conf
nano domains/site3.user1.fs.al.conf

ls letsencrypt/
ls letsencrypt/live/
ls letsencrypt/live/site3.user1.fs.al/
We did not setup the configuration of revproxy for these domains,
for example we did not use the command ds domains-add .... How were
these configurations added?
The key is the variable DOMAIN on settings.sh. When we run ds make, it calls in turn ds create, and the function that creates a
container has also these lines of code:
    # add DOMAIN to revproxy
    if [[ -n $DOMAIN ]]; then
        ds revproxy add
        ds revproxy ssl-cert
    fi
ls /opt/docker-scripts/ds/
ls /opt/docker-scripts/ds/src/
ls /opt/docker-scripts/ds/src/cmd/
nano /opt/docker-scripts/ds/src/cmd/create.sh
So, the commands ds revproxy add and ds revproxy ssl-cert are
called automatically, if the variable DOMAIN is defined on
settings.sh.
2.6 ds revproxy
The command ds revproxy is a global one, which is installed by the
container revproxy. Being "global" means that it can be used by
any container. It helps these containers to interact with the
revproxy container, for example to register a domain, to get an
SSL certificate for this domain, etc
-
It is installed at
~/.ds/cmd/revproxy.sh:ls ~/.ds/cmd/
nano ~/.ds/cmd/revproxy.sh -
Display usage and list a domain:
ds revproxy
cd /var/ds/test/site1.example.com/
ds revproxy
grep DOMAIN settings.sh

ds revproxy ls
ds @revproxy domains-ls -
Remove the configuration of the domain from revproxy:
ds revproxy rm
ds revproxy ls
ds @revproxy domains-ls
ls -1 /var/ds/revproxy/domains/ -
Add it back:
ds revproxy add
ds revproxy ls
ds @revproxy domains-ls
ls -1 /var/ds/revproxy/domains/ -
Get or renew the SSL certificate for the domain:
cd ../site3.user1.fs.al/
ds revproxy ssl-cert
The commands ds revproxy and ds @revproxy ... may seem like
similar, however the first one is a command that runs in the context
(directory) of the container (test/site1.example.com/), while the
second one is a command that runs on the context (directory) of the
revproxy. So, the first command has access to the variable
DOMAIN of the container, and the second one does not.
3. More topics
3.1 Resolving the IP of the container
Let's look again at the configuration of a domain:
cd /var/ds/revproxy/
ls domains/
grep proxy_pass domains/site3.user1.fs.al.conf
nano domains/site3.user1.fs.al.conf
The proxy_pass directive seems to forward the request back to
revproxy itself, thus creating an infinite loop. However this is not
the case, because the domain site3.user1.fs.al, inside the docker
virtual network, resolves to the IP of the container that serves this
domain. We can verify this with a ping:
-
On the host:
ping site3.user1.fs.al -
Inside the revproxy container:
ds @revproxy shell
apt install iputils-ping
ping site3.user1.fs.al
exit

docker ps
docker inspect site3.user1.fs.al
docker inspect site3.user1.fs.al | grep IPAddress
How does it happen?
The script that creates the container, contains also these lines of code:
    local network=" --network $NETWORK"
    network+=" --network-alias $CONTAINER"
    if [[ -n $DOMAIN ]]; then
        for domain in $DOMAIN $DOMAINS; do
            network+=" --network-alias $domain"
        done
    fi
cd /opt/docker-scripts/ds/
nano src/cmd/create.sh
So, for each domain that is served by the container, we append a
--network-alias option to the command docker create. This is
something like the /etc/hosts for the docker virtual network where
the container is connected, and will instruct the domain resolver of
this virtual network to resolve this alias (domain name) to the IP of
the container.
3.2 Set the real IP
A container that is behind a reverse proxy gets the HTTP request from the proxy, not from the client. So, the client IP that it sees is that of the reverse proxy. You can check this on the access logs of nginx or apache2 inside the container.
The revproxy is configured to send the IP of the client to the
container, using the header X-Forwarded-For. However the nginx or
apache2 (or any other webserver) inside the container must be
configured to use this header for getting the real IP of the
client. Webservers don't do this by default for security reasons (HTTP
headers can be spoofed easily). That's why you also have to tell the
webserver the IP (or network) of the revproxy, so that it can
trust the header X-Forwarded-For that comes from it.
-
Check the logs of
site3.user1.fs.alcd /var/ds/test/site3.user1.fs.al
ds exec ls /var/log/nginx/
ds exec tail /var/log/nginx/access.log -n5Notice that the IP of the requests is actually the IP of the revproxy container.
-
Set up the nginx configuration to get the real IP of the client, which is provided by revproxy on the header
X-Forwarded-For:ds inject set_real_ip.sh -
Check again what is logged:
curl https://site3.user1.fs.al
ds exec tail /var/log/nginx/access.log -n5
Open in browser https://site3.user1.fs.al and check again:
ds exec tail /var/log/nginx/access.log -n5 -
Let's have a look at how the configuration was done:
/opt/docker-scripts/revproxy/

ls test/app1/inject/
nano test/app1/inject/set_real_ip.sh

ls test/app2/inject/
nano test/app2/inject/set_real_ip.sh
4. Clean up
Let's clean up the test containers:
docker ps
docker images

ds @test/site1.example.com remove
ds @test/site2.example.com remove
ds @test/site3.user1.fs.al remove

docker ps
docker images
docker system prune

cd /var/ds/
ls
ls test/
rm -rf test/

cd /var/ds/revproxy/
ls domains/
ds domains-rm \
    site1.example.com \
    site2.example.com \
    site3.user1.fs.al
ls domains/

ls letsencrypt/live/
ds del-ssl-cert site3.user1.fs.al
ls letsencrypt/live/

cat /etc/hosts
sed -i /etc/hosts -e '/example\.com/d'
cat /etc/hosts