Discourse
1. The scripts
The official Discourse release uses its own Docker framework for
installing everything that is needed for the application. Our scripts
are just a shallow wrapper to this framework. They just customize a
few settings to make it fit with the rest of docker-scripts apps (for
example placing it behind revproxy).
We can get the scripts from
https://gitlab.com/docker-scripts/discourse with ds pull:
ds pull discourse

cd /opt/docker-scripts/discourse/
tree
Because Discourse uses its own image and its own docker framework
(which, by the way, is not docker compose), we don’t need a
Dockerfile. We also override the commands build, create and
config to make sure that they do nothing:
nano cmd/build.sh
nano cmd/create.sh
nano cmd/config.sh

nano misc/init.sh
misc/init.sh is called by the command ds init. It just clones
the official discourse repo inside the directory.
To make the application, the config file settings.sh and the script
ds.sh are used:
nano settings.sh
nano ds.sh
The file ds.sh is loaded automatically by the framework, when
present, and can be used to override some framework functions, or to
define new auxiliary functions. In this case, it is redefining
cmd_start(), cmd_stop(), etc. in terms of the command launcher
inside discourse_docker/, which is the official tool for managing
the discourse containers. Two containers are managed: one for the app
itself and one called mail-receiver.
cmd_make()
The most important function is cmd_make(), which does all the
building and setup:
- add a revproxy domain and get a ssl-cert
- copy the app and mail-receiver config files
- build the app and mail-receiver containers
- create cron jobs, and make other configurations
Configuration files for the app and mail-receiver containers are
copied from discourse_docker/samples/standalone.yml and
discourse_docker/samples/mail-receiver.yml to
discourse_docker/containers/ and then modified/customized.
They are copied only if they don't exist already. If they exist, they are not touched, because they can have manual customizations.
Some of the customizations that are done to
discourse_docker/containers/talk.example.org.yml are these:
-
The exposed ports
80and443are commented out, since the container will get the https requests fromrevproxy. -
The container is connected to the docker-scripts network, using the docker args
--networkand--network-alias. -
Volumes are mounted to the local directory
/var/ds/talk.user1.fs.al/discourse_docker/(instead of/var/disocurse/).noteThis is according to the docker-scripts policy of keeping all the configuration and data of an application in the same directory, which makes their management easier.
-
Email settings are assigned according to the values on
settings.sh. -
SSL is enabled (by uncommenting
web.ssl.template.yml).noteThis also requires an SSL certificate. For this reason we are copying the LetsEncrypt certificate from revproxy to the appropriate place, where it can be loaded by the application as an external SSL certificate. Actually, a cron job is created that runs the command
ds copy-ssl-certperiodically, each week. -
We also add a line for each plugin listed on
settings.sh, and customize some other settings.
The cron jobs that are created look like this:
-
/etc/cron.d/talk-user1-fs-al-restart# restart the application @/var/ds/talk.user1.fs.al each week
0 0 * * 0 root bash -l -c "ds @/var/ds/talk.user1.fs.al restart &> /dev/null" -
/etc/cron.d/talk-user1-fs-al-copy-ssl-cert# copy the ssl cert @/var/ds/talk.user1.fs.al each week
0 0 * * 0 root bash -l -c "ds @/var/ds/talk.user1.fs.al copy-ssl-cert &> /dev/null"
2. Installation
To install Discourse we need at least 4GB RAM free.
free -h
htop
glances
If there is less than 4GB RAM available, we can stop some
applications. For example let's stop the incus container edu:
incus stop edu
Now let's initialize the container and build it:
ds init discourse @talk.user1.fs.al
cd /var/ds/talk.user1.fs.al/
nano settings.sh
Set ADMIN_EMAIL and remove some of the plugins. Then start building
the container:
ds make
Note: This usually takes some time, especially with a small and not quite powerful VPS.
After it is done, let's check what happened:
ls
cd discourse_docker/

ls
ls containers/
nano containers/talk.user1.fs.al.yml
ls samples/
diff -u \
    samples/standalone.yml \
    containers/talk.user1.fs.al.yml \
    > d.diff
nano d.diff

nano containers/talk.user1.fs.al-mail-receiver.yml
diff -u \
    samples/mail-receiver.yml \
    containers/talk.user1.fs.al-mail-receiver.yml \
    > d.diff
nano d.diff
rm d.diff

docker ps | grep discourse
docker logs talk.user1.fs.al -f
docker logs talk.user1.fs.al-mail-receiver -f
Discourse usually does not need more than 1GB or 2GB of RAM, while running (only while installing it needs at least 4GB of RAM). So, we can start again the containers that we stopped before installing Discourse:
free -h

incus ls
incus start edu
3. Setup
Open https://talk.user1.fs.al and continue the setup and configuration of the site.
-
For more details look at: Start Discourse
-
The setup wizard can also be restarted by opening: https://talk.user1.fs.al/wizard
-
You should also check the "Admin Guide: Getting Started": https://talk.user1.fs.al/t/admin-guide-getting-started/
The following sections explain some settings that are important, or specific to the way that we installed Discourse.
3.1 Sending emails
The SMTP variables on settings.sh are used to set automatically the
values of SMTP settings on the configuration file of the Discourse
container, discourse_docker/containers/talk.user1.fs.al.yml, which
look like this:
env:

  # . . . . . . . . . .

  ## TODO: The SMTP mail server used to validate new accounts and send notifications
  # SMTP ADDRESS, username, and password are required
  # WARNING the char '#' in SMTP password can cause problems!
  DISCOURSE_SMTP_ADDRESS: smtp.user1.fs.al
  DISCOURSE_SMTP_PORT: 25
  DISCOURSE_SMTP_USER_NAME:
  DISCOURSE_SMTP_PASSWORD:
  DISCOURSE_SMTP_ENABLE_START_TLS: true
  #DISCOURSE_SMTP_DOMAIN: discourse.example.com    # (required by some providers)
  #DISCOURSE_NOTIFICATION_EMAIL: noreply@discourse.example.com    # (address to send notifications from)
Despite the comment saying that username and password are required, we actually don’t need them because we are using the Simple SMTP Server, which allows applications from trusted hosts to send emails without authentication.
If you make some modifications to this yaml file, to apply them you have to rebuild the container:
cd /var/ds/talk.user1.fs.al/
cd discourse_docker/
./launcher rebuild talk.user1.fs.al
3.2 Discourse email settings
To customize the discourse settings related to sending emails, we login as admin and go to "Admin / All Site Settings": https://talk.user1.fs.al/admin/site_settings/
There are too many settings there, but we can locate a setting quickly by typing its name on the filter box. Let's make sure that we set properly these settings:
- notification email: talk@user1.fs.al
- contact email: admin@user1.fs.al
- log mail processing failures: checked
- unsubscribe via email footer: checked
For other email settings, that you might want to customize, look at https://talk.user1.fs.al/admin/site_settings/category/email
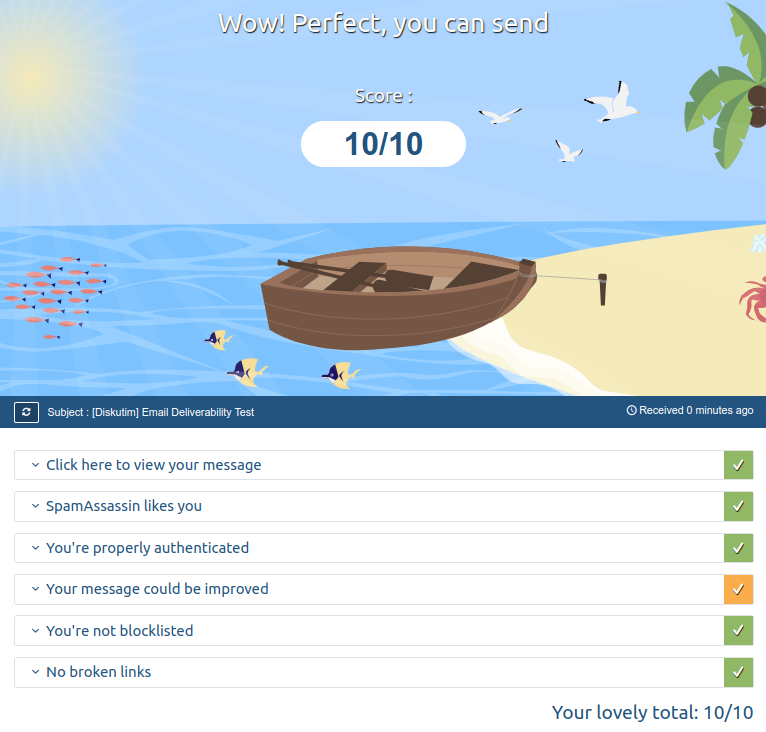
3.3 Test sending emails
You can send a test email, from Discourse to your email address, at https://talk.user1.fs.al/admin/email/server-settings

To check the health of the mail server:
-
Go to https://www.mail-tester.com/ and copy the displayed email address.
-
Go to the email settings of Discourse and send a test email to the address given by the mail-tester.
-
Go back to the mail-tester and check the score.
You should see something like this:
3.4 Mail receiver
Discourse can send emails about the new topics and replies, notifications, etc. It would be nice if people can also reply or create new topics by email. This would make Discourse more similar to a mailing list. This documentation page explains how this is usually done: Configure incoming email with Mail-Receiver
It is using an additional container for receiving and processing
incoming emails. The command ds make has already created the
container talk.user1.fs.al-mail-receiver, which is based on the
configuration containers/talk.user1.fs.al-mail-receiver.yml. This
container is able to receive emails, process them accordingly, and
push the necessary data to the container talk.user1.fs.al, using the
API of discourse. However some additional steps are needed, in order
to make it functional.
3.4.1 Add an MX record on the DNS
On containers/talk.user1.fs.al-mail-receiver.yml we have set
MAIL_DOMAIN to talk.user1.fs.al, so we need a DNS record like
this:
talk.user1.fs.al. IN MX 10 smtp.user1.fs.al.
smtp.user1.fs.al is the name of the SMTP
Server.
Without this DNS record, emails sent to an address @talk.user1.fs.al
cannot be routed to our server.
cd /var/ds/nsd/
ls zones/
nano zones/user1.fs.al.db
ds restart
On zones/user1.fs.al.db, append these lines, and don't forget to
update the serial number as well:
; Discourse
talk.user1.fs.al.    IN    A           188.245.242.143
talk.user1.fs.al.    IN    MX    10    smtp.user1.fs.al.
We can check that the record is already available with:
dig MX talk.user1.fs.al
3.4.2 Relay emails to mail-receiver
The container talk.user1.fs.al-mail-receiver is hosted on the same
server as smtp.user1.fs.al, so we cannot forward the SMTP ports to
it, because they are being used for the mail server
smtp.user1.fs.al. However, the simple SMTP server
(smtp.user1.fs.al) can relay the mails for the domain
talk.user1.fs.al. The section Relay
domains describes in
details how this can be done.
-
Create a local command
ds relay-setup, like this:cd /var/ds/smtp.user1.fs.al/
mkdir -p cmd
nano cmd/relay-setup.shcmd/relay-setup.sh:cmd_relay-setup() {
# create a config file for relay_domains
cat <<EOF > config/relay_domains
talk.user1.fs.al
EOF
# create a config file for transport_maps
cat <<EOF > config/transport_maps
talk.user1.fs.al smtp:mail-receiver.talk.user1.fs.al:25
EOF
# setup transport_maps
ds exec postconf -e 'transport_maps=hash:/host/config/transport_maps'
ds exec postmap /host/config/transport_maps
# setup relay_domains
ds exec postconf -e relay_domains=/host/config/relay_domains
# reload postfix configuration
ds exec postfix reload
}It will set the settings
relay_domainsandtransport_maps. Postfix will accept the emails of the domain@talk.user1.fs.al, and will transport (forward) them to the port25of the servermail-receiver.talk.user1.fs.al, using the smtp protocol.note-
mail-receiver.talk.user1.fs.alis resolved in the docker network to the IP of the mail-receiver container, because of the docker option--network-aliasthat we are using while building this container. -
the port
25of the mail-receiver container is not published, but it is still available and accessible in the docker network, so it can be accessed by the Postfix container that is acting as a relayer/forwarder.
-
-
In order to automatically call the command
ds relay-setupwhenever the SMTP container is rebuilt, we can override the commandds configlike this:cat <<'EOF' > cmd/config.sh
rename_function cmd_config standard_config
cmd_config() {
standard_config
ds relay-setup
}
EOF
nano cmd/config.shThis creates a local
configcommand, that extends the standard one. -
Enable the new configuration:
ds make

ls config/
cat config/relay_domains
cat config/transport_maps
ds exec postconf relay_domains
ds exec postconf transport_maps
3.4.3 Set an API key
The mails now should arrive to the mail-receiver, but it also needs an API key in order to push them to the Discourse container.
-
Login as admin and go to: https://talk.user1.fs.al/admin/api/keys
-
Create a new API key:
- Description: mail-receiver container
- User Level: Single User
- User: system
- Scope: Granular
- Scopes: "email" / "receive emails"
-
Copy the generated API key, and set it to the variable
DISCOURSE_API_KEYatcontainers/talk.user1.fs.al-mail-receiver.yml -
Rebuild the container
talk.user1.fs.al-mail-receiver:./launcher rebuild talk.user1.fs.al-mail-receiver
3.4.4 Discourse configuration
Now that email is being fed into Discourse, it’s time to explain to Discourse what to do with the emails it receives.
-
Login as admin and navigate to "Admin / All Site Settings / Email": https://talk.user1.fs.al/admin/site_settings/category/email
-
Change the following settings:
-
Check the setting "manual polling enabled".
-
In the "reply by email address" field, enter:
replies+%{reply_key}@talk.user1.fs.al -
Check the "reply by email enabled" setting.
-
Check the setting "email in".
-
-
Other optional settings:
-
"email in allowed groups"
-
"unsubscribe via email footer"
-
You can use any address @talk.user1.fs.al as an address for category
or group emails. This address has to be defined on the settings of the
category or group.
3.4.5 Troubleshooting
-
From outside the server, send a test email to
nobody@talk.user1.fs.al:apt install --yes swaks
swaks --from somebody@gmail.com --to nobody@talk.user1.fs.alAlternatively, you can also send it from GMail or any other account.
-
Check the logs on the SMTP server, to make sure that it arrived there:
cd /var/ds/smtp.user1.fs.al/
ds exec tail /var/log/mail.log -f -
Check the logs of
mail-receiverto make sure that the message arrived there:docker logs talk.user1.fs.al-mail-receiver -fYou should see a message like this:
NOQUEUE: reject: RCPT from smtp.user1.fs.al[188.245.242.143]: 554 5.7.1 \
    <nobody@talk.user1.fs.al>: Recipient address rejected: \
    Mail to this address is not accepted. Check the address and try to send again?;
3.5 Install plugins
On the configuration of the application
(containers/talk.user1.fs.al.yml) there is a list of commands that
clone plugin repos. Append the commands for the plugin(s) you want to
install. Afterwards rebuild the container:
./launcher rebuild talk.user1.fs.al
To remove a plugin, remove it from the list and then rebuild the container.
It is a good idea to make a backup before installing a plugin.
4. Maintenance
-
Backup and restore:
cd /var/ds/talk.user1.fs.al/

ds backup
ds restore

ds discourse -
Upgrade:
ds upgrade -
Clone:
ds clone talk-1.user1.fs.al
Cloning is usually needed to build a test site
Sometimes it is better to test some changes (for example installing a new plugin) on a clone of the site, and then apply them to the main site.
Cloning is done like this:
-
Make a backup of the site.
-
Initialize and build a new discourse instance for the clone.
-
Restore the backup of the main site to the clone.
-
Run discourse commands to rename the domain of the clone.
-
Disable any outgoing emails on the clone (since it is used for testing).
Since cloning involves building a new Discourse instance, make sure that there are at least 4GB free RAM available (maybe by stopping some the containers).
-
Let's edit
/var/ds/_scripts/backup.shand append these lines:cat <<EOF >> /var/ds/_scripts/backup.sh
cd /var/ds/talk.user1.fs.al/
ds backup
find backup -type f -name "*.tar.gz" -mtime +5 -delete
EOF
nano /var/ds/_scripts/backup.sh -
Edit
/var/ds/_scripts/update.shand add these lines:# discourse
cd /var/ds/talk.user1.fs.al/
ds upgrade
5. More
A useful admin guide is at: https://talk.user1.fs.al/t/admin-guide-getting-started/6 (you have to be logged in as admin).
Other docs/pages that might be interesting: