WireGuard
1. VPN tunnel
If you are connected to an unknown WiFi hotspot (one that is not under your control), it is quite possible that someone may try to eavesdrop your communications, and maybe try to hack you. The recommended solution is to use a VPN tunnel like this for connecting to the Internet:
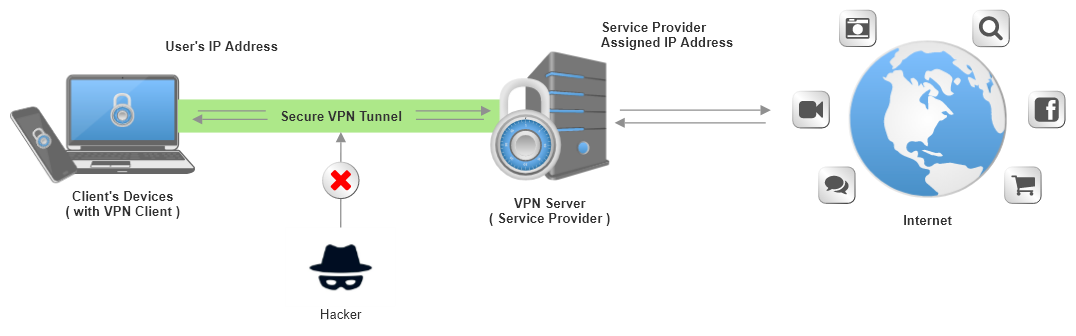
We can build such a tunnel with WireGuard, which is a simple, fast and modern VPN that utilizes state-of-the-art cryptography. It is quite flexible and can be used in many situations.
3.1 Install a WG container
-
Get the scripts:
ds pull wireguard
ls /opt/docker-scripts/wireguard/ -
Initialize a directory for the container:
ds init wireguard @vpn1
cd /var/ds/vpn1/
ls
nano settings.sh
The script
misc/init.sh, which is invoked byds init, tries to set some proper values tosettings.sh.nano /opt/docker-scripts/wireguard/misc/init.sh -
Make the container:
ds make
3.2 Client config files
-
Create configuration files for clients:
ds client
ds client add test1 192.168.100.1
ds client add test2 192.168.100.2
ds client ls
ls
ls clients
nano clients/test1.conf

nano wg0.conf
nano wg0.sh -
Transfer config files to the corresponding clients.
It can be done with copy/paste, with
scporsftp, or using the commandds share:ds share
ds share qr test1
ds share www test1
ls www/
ds share www stop
ls www/
3.3 Setup VPN on debian
Let's see how to set up the VPN connection on Debian12:
-
Install
wireguard:apt install wireguard -
Test the configuration file:
wg-quick up ./client1.conf
#apt install systemd-resolved

ip addr
ping 10.100.100.1
ping 8.8.8.8
traceroute 8.8.8.8
curl -4 icanhazip.com

wg-quick down ./client1.conf
ip addr
curl -4 icanhazip.com -
Start the VPN connection as a service:
mv test1.conf /etc/wireguard/wg0.conf

systemctl enable wg-quick@wg0
systemctl start wg-quick@wg0
systemctl status wg-quick@wg0

ip addr
ping 10.100.100.1
ping 8.8.8.8
traceroute 8.8.8.8
curl -4 icanhazip.com
3.4 Setup another client
-
Install
wireguard:apt install wireguard -
Get the configuration and start the connection:
wg-quick up ./client2.conf
ip addr
ping 10.100.100.1
ping 8.8.8.8
traceroute 8.8.8.8
curl -4 icanhazip.com -
Notice that clients cannot access (
ping) each-other:ping 192.168.100.1This is because the setting
CLIENT_TO_CLIENT=yeson the WG server is not enabled. -
Let's try to uncomment
CLIENT_TO_CLIENT=yesonsettings.sh, on the WG server, and restart it:cd /var/ds/vpn1/
nano setting.sh
ds restartThen check again whether clients can ping each-other.
-
If you want clients to be able to access each-other at any time, you should also uncomment
KEEPALIVE_PERIOD=25onsettings.sh.In this case, a restart of the container is not enough, because this value is stored on the client config files. So, the client config files should be modified as well, like this:
PersistentKeepalive = 25
3.5 Setup on a smartphone
For smartphones there are apps, usually named WireGuard, that can be
used to setup VPN connections. A client configuration usually can be
scanned from a qrcode, which can be generated with ds share:
ds share
ds share qr client3
ds share www client3
However there is a problem, the smartphone does not recognize this instruction on the config file:
PostUp = resolvectl dns %i 94.140.14.14 94.140.15.15
So, either comment it out, or replace it with this line:
DNS = 94.140.14.14,94.140.15.15
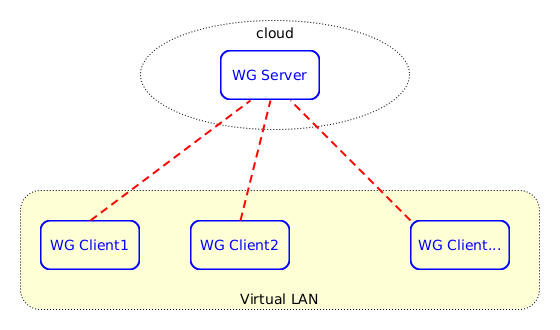
2. Virtual Private LAN
Let's say that we want our clients to communicate with each-other safely and securely, as if they are in a private LAN. In this case they don't use the VPN for accessing the internet, they use it just to communicate with each-other, as shown in these diagrams:

-
Let's make another VPN container for this case:
ds init wireguard @vpn2
cd /var/ds/vpn2/
nano settings.sh
ds make -
Let's use
ds setupto facilitate the configuration:ds setup | less
ds setup lan 192.168.20.0/24 client1 client2 client3It will make sure to set these values to
settings.sh:ROUTED_NETWORKS='192.168.20.0/24'
ALLOW_INTERNET_ACCESS=no
CLIENT_TO_CLIENT=yes
KEEPALIVE_PERIOD=25It will also create the configurations for the clients
client1,client2andclient3:ds client ls
ls clients/
nano clients/client1.conf
nano wg0.conf -
All that remains is to transfer these config files to the corresponding clients, to setup WG connections there, and to test the connectivity.
3. More details
For more details see: