Wordpress
1. Introduction
With docker-scripts we can have one or more Wordpress containers, and each container can serve one or more sites, as shown in this diagram:
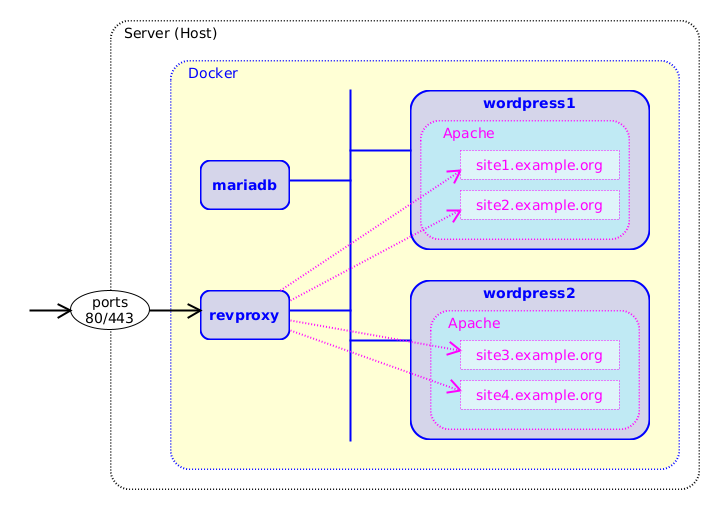
Since all these sites use the ports 80 and 443, we need a reverse
HTTP proxy in order to forward each request to the corresponding
container that serves that site/domain. The docker-scripts container
revproxy plays this role, using nginx. Not only that, but
revproxy also gets automatically a free LetsEncrypt SSL
certificate for each domain/site that it manages, and also redirects
automatically all HTTP requests to HTTPS.
So, only the revproxy container gets the ports 80/443 forwarded
from the host. The Wordpress containers (wordpress1 and
wordpress2) get their requests from revproxy through the
docker LAN, so they don’t need to expose the ports 80/443 to the
host or to the outside world.
Each Wordpress container in turn uses virtual domains to be able to serve several sites/domains (one or more).
Each Wordpress site needs also a database, and all of them use the docker-scripts container mariadb, which they access through the docker LAN.
2. Install dependencies
We have already installed docker, docker-scripts, and revproxy. Let's also install MariaDB:
ds pull mariadb
ds init mariadb @mariadb
cd /var/ds/mariadb/
nano settings.sh
ds make
3. Install Wordpress sites
3.1 Install a wordpress container
ds pull wordpress
cd /opt/docker-scripts/wordpress/
ls
tree
nano Dockerfile
nano inject/setup.sh
ds init wordpress @wordpress1
cd /var/ds/wordpress1/
nano settings.sh
ds make

ls
ls apache2/
ls apache2/sites-available/
3.2 Initialize and install a Wordpress site
ds site
ds site init site1.user1.fs.al

ls
ls site1.user1.fs.al
ls apache2/sites-enabled/
nano apache2/sites-enabled/site1.user1.fs.al.conf

ls ../revproxy/domains/
nano ../revproxy/domains/site1.user1.fs.al.conf
Initializing a site with ds site init <domain> not only creates a
directory for this site, but also creates the necessary VirtualHost
configurations for it on the containers revproxy and
wordpress1. It also gets a free SSL certificate from LetsEncrypt
for this site/domain.
After initializing the site, we can customize its settings.sh and
then install wordpress in it:
nano site1.user1.fs.al/settings.sh
sed -i site1.user1.fs.al/settings.sh \
    -e '/^TITLE/ c TITLE="site1.user1.fs.al"'
ds site install site1.user1.fs.al
ls site1.user1.fs.al/
Now you can open in browser https://site1.user1.fs.al and login as admin.
3.3 Install another site on the same container
cd /var/ds/wordpress1/
ds site init site2.user1.fs.al

ls
ls site2.user1.fs.al
ls -l apache2/sites-enabled/
ds @revproxy domains-ls
ls ../revproxy/domains/

nano site2.user1.fs.al/settings.sh
sed -i site2.user1.fs.al/settings.sh \
    -e '/^TITLE/ c TITLE="site2.user1.fs.al"'
ds site install site2.user1.fs.al
ls site2.user1.fs.al/
Open in browser https://site2.user1.fs.al/wp-admin and login as admin.
3.4 Install a second wordpress container
ds init wordpress @wordpress2
cd /var/ds/wordpress2/
nano settings.sh
ds make
3.5 Install a third site on the second container
ds site init site3.user1.fs.al
vim site3.user1.fs.al/settings.sh
sed -i site3.user1.fs.al/settings.sh \
    -e '/^TITLE/ c TITLE="site3.user1.fs.al"'
ds site install site3.user1.fs.al
ls site3.user1.fs.al/
4. Manage a Wordpress site
4.1 Backup and restore
-
Backup
site3:ds backup
ds backup site3.user1.fs.al
ls -lh backup/ -
Delete
site3and then try to restore it from the backup:ds site del site3.user1.fs.al
ls
ls apache2/sites-enabled/
ds @revproxy domains-lsBefore restoring, we have to initialize it:
ds site init site3.user1.fs.al
ls site3.user1.fs.al/
ds restore
ds restore site3.user1.fs.al \
    backup/wordpress-site3.user1.fs.al-*.tgz
ls site3.user1.fs.al/
4.2 Clone a site
ds site clone
ds site clone site3.user1.fs.al site4.user1.fs.al
Cloning a site to another one actually initializes the new site, then
makes a backup on the source site and restores it on the target site,
and finally fixes the options siteurl and home of the new site.
Try it in browser: https://site4.user1.fs.al
Cloning a site might be useful when you want to try something new on the site, for example a new plugin or some configuration. Instead of applying it directly to the site, you may want to test it first on a clone.
Delete:
ds site del site4.user1.fs.al
4.3 Using wp-cli
ds wp
ds wp site3.user1.fs.al
ds wp site3.user1.fs.al option
ds wp site3.user1.fs.al option get siteurl
ds wp site3.user1.fs.al option get home
From inside the container:
ds shell
ls
cd site3.user1.fs.al
wp
wp option get siteurl
wp option get home
exit
4.4 Clean up
cd /var/ds/wordpress2/
ds site del site3.user1.fs.al

ds remove
cd ..
rm -rf wordpress2

ls revproxy/letsencrypt/live/
ds @revproxy del-ssl-cert site4.user1.fs.al
ds @revproxy del-ssl-cert site3.user1.fs.al
5. Multiple sites vs. multiple containers
As we have seen, we can install multiple sites in a single Wordpress container, but we can also install a single site for each Wordpress container. Which one is better?
It depends.
When we consolidate multiple sites in a single Wordpress container we use less resources (RAM and disk space) then installing each site on its own container.
However if one of these sites is compromised (for example you install a plugin with a security hole) it can potentially compromise the other sites that are on the same container.
If each site is on its own container, they are better encapsulated from each-other.